金桔
金币
威望
贡献
回帖0
精华
在线时间 小时
|
登陆有奖并可浏览互动!
您需要 登录 才可以下载或查看,没有账号?立即注册


×
时间分辨荧光光谱(TRPL)测量是分析材料性质的重要手段。在处理TRPL时,有时需要考虑仪器响应函数的影响,这时拟合步骤就变得较为复杂。本文将逐步讲解包含仪器响应的时间分辨拟合步骤。
原材料:Origin,TRPL测量数据,仪器响应函数(IRF)
我们在后续部分解决仪器响应函数如何得到的问题。首先我们将样品的TRPL测量数据导入Origin,得到如下的数据表和数据图:
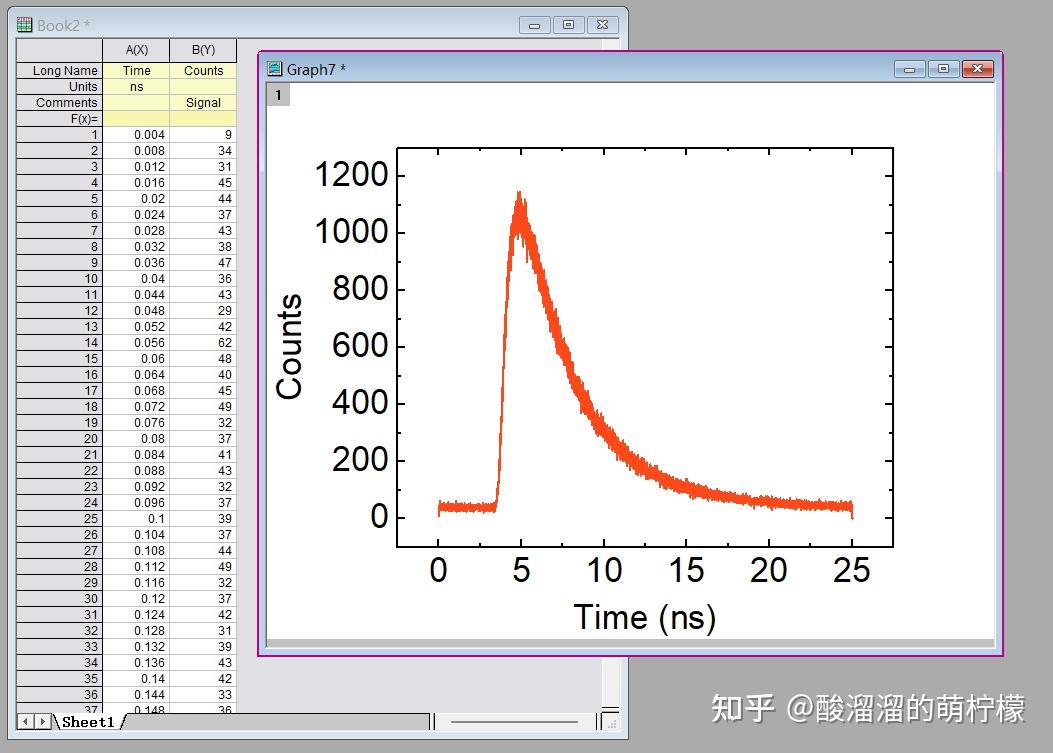
图1 TRPL测量数据
一、不考虑仪器响应函数的简单拟合
如果荧光的寿命较长,或者要求不太严格,可以按照下面的步骤直接拟合:1. 点击工具栏中的数据选择工具,2. 选中一段下降过程,3. 快捷键Ctrl+Y打开拟合窗口,选择单指数衰减函数ExpDec1,拟合。拟合结果在文章末尾统一展示。
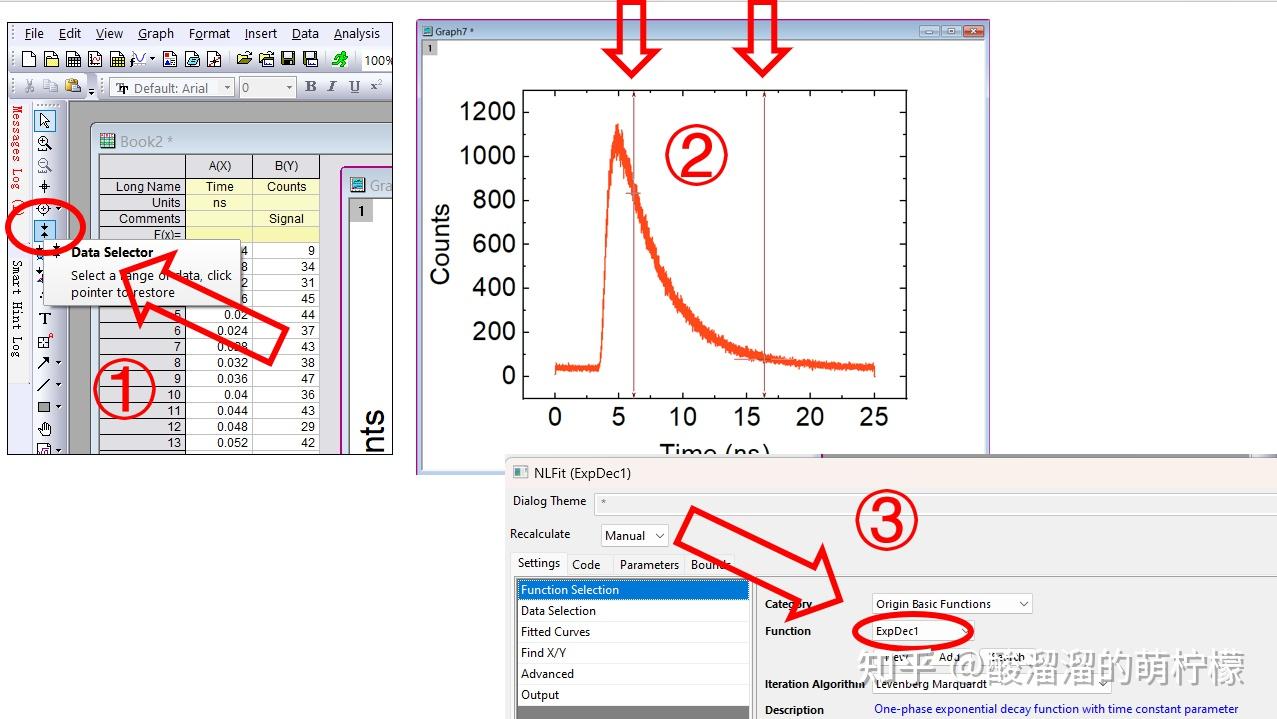
图2 简单拟合过程
二、仪器响应函数及测量
如果荧光寿命较短,已经接近测量仪器的时间分辨率,我们就需要考虑仪器响应函数(IRF)带来的影响。关于仪器响应函数的解释,这里请AI代劳:
IRF反映了整个TRPL系统(激发、探测与信号采集)对理想瞬时脉冲信号的“模糊化”效应。即使样品发光是瞬时的(如δ函数),测量系统的时间特性会将其展宽为有限宽度的信号。IRF的主要来源包括:
激发光源的时间特性:激光脉冲的有限宽度(如飞秒激光的脉宽为~100 fs)。
探测链的响应限制:探测器及电子学系统的时间延迟与抖动。
光学路径的非理想性:如光学元件的色散、多路径反射等。 最终的IRF表现为各组成部分响应函数的卷积,其时间尺度大致在几百皮秒到几纳秒的范围内。
为了在系统中获得IRF,最简单的做法是将原先的待测样品替换为平整的反射镜或者硅片,然后将激光的反射光看作“荧光”测量其弛豫寿命。此时所谓的“荧光”就是δ函数,因此测量结果就等于IRF。此外,如果有已知荧光寿命远小于系统时间分辨率的样品,也可以用于测试,测试结果近似等于IRF。
在这里,我们用硅片测量到了如下的IRF数据和曲线:
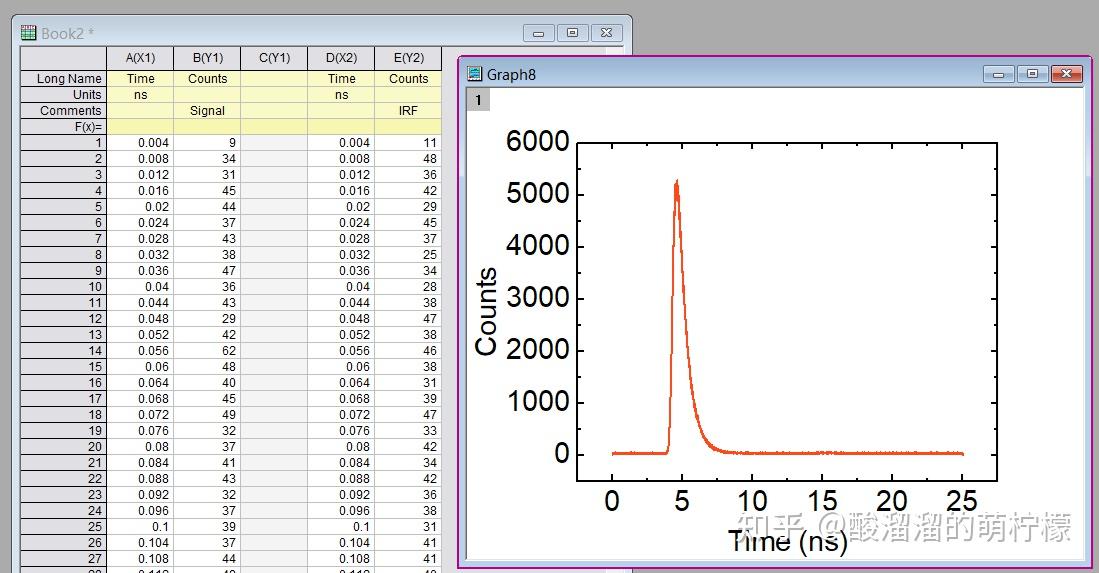
图3 仪器响应曲线
三、包含仪器响应函数的荧光寿命拟合
至此,我们所需的原材料已经备齐,可以开始进行卷积拟合。拟合方法本身源自Origin的官方帮助文档,感兴趣的朋友可以搜索并阅读原文:Help Online - Tutorials - Fitting with Convolution。简单地说,拟合方法的思路就是编写一个卷积程序,让Origin在每次拟合时都进行一次指数衰减函数和IRF的卷积,并把卷积结果和实验结果比较,确定是否拟合成功。接下来,我们要进行一些拟合前的准备工作。
第一步,新建拟合函数。1. 按快捷键Ctrl+Y打开拟合窗口,点击新建函数(new),2. 输入函数名FitConv,3. 选择函数类型为Origin C,4. 点击下一步,5. 在第二个页面输入参量y0,A,t, 6. 点击下一步,7. 在第三个页面中打开代码编辑器。
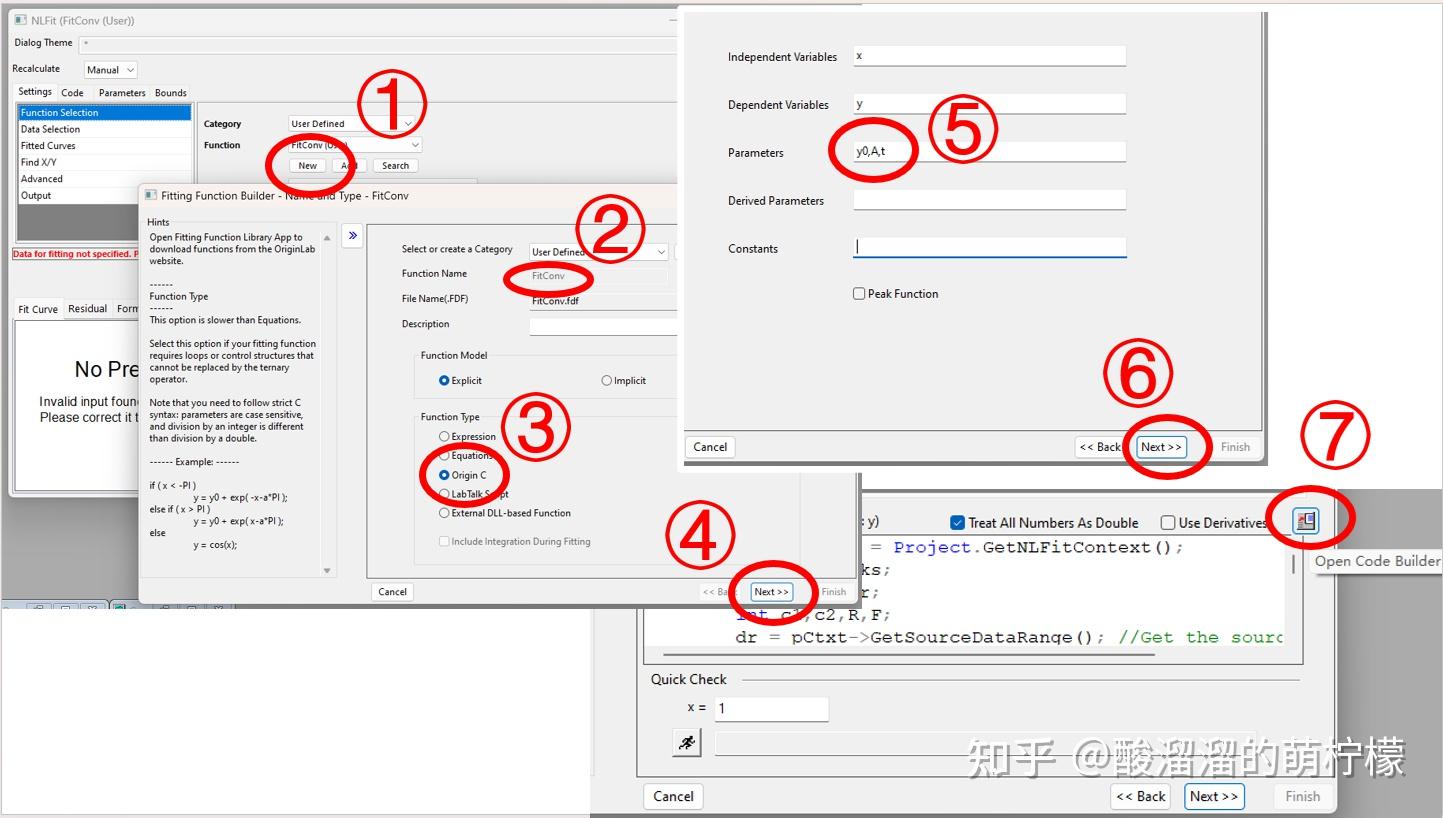
图4 新建拟合函数其一
- 打开代码编辑器后,在第4行,即粉红色的<origin.h>的下面插入两行头文件:
#include <ONLSF.H>
#include <fft_utils.h>2. 之后在第40行,即灰色的Beginning和End of editable part之间插入
NLFitContext *pCtxt = Project.GetNLFitContext();
Worksheet wks;
DataRange dr;
int c1,c2;
dr = pCtxt->GetSourceDataRange(); //Get the source data range
dr.GetRange(wks, c1, c2); //Get the source data worksheet
if ( pCtxt )
{
// Vector for the output signal in each iteration.
static vector vSignal;
// If parameters were updated, we will recalculate the convolution result.
BOOL bIsNewParamValues = pCtxt->IsNewParamValues();
if ( bIsNewParamValues )
{
// Read sampling and response data from worksheet.
Dataset dsSampling(wks, 0);
Dataset dsResponse(wks, 2);
int iSize = dsSampling.GetSize();
vector vResponse, vSample;
vResponse = dsResponse;
vSample = dsSampling;
vSignal.SetSize(iSize);
vResponse.SetSize(iSize);
vSample.SetSize(iSize);
// Compute the exponential decay curve
vSignal = A * exp( -t*vSample );
// Perform convolution
int iRet = fft_fft_convolution(iSize, vSignal, vResponse);
//Correct the convolution by multiplying the sampling interval
vSignal = (vSample[1]-vSample[0])*vSignal;
}
NLSFCURRINFO stCurrInfo;
pCtxt->GetFitCurrInfo(&stCurrInfo);
// Get the data index for the iteration
int nCurrentIndex = stCurrInfo.nCurrDataIndex;
// Get the evaluated y value
y = vSignal[nCurrentIndex] + y0;
// For compile the function, since we haven't use x here.
x;
}3. 点一下左上角的编译按钮(Compile),4. 看看编译是否通过(Done)。5. 编译完成后点击左上角的返回对话框(Return to Dialog),再点击下一步、结束即可完成拟合函数的新建。此时我们先关闭拟合对话框。
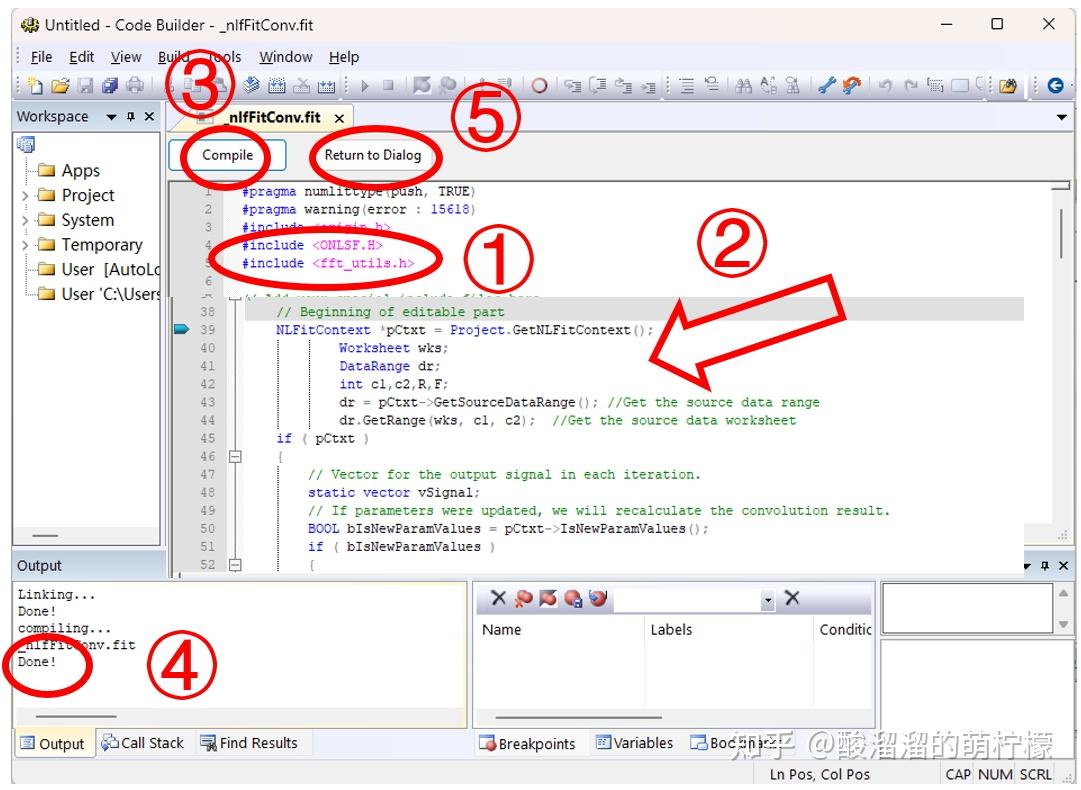
图5 新建拟合函数其二
第二步,处理IRF数据。在使用新建的卷积拟合之前,我们还需要对测量到的IRF进行处理。首先将IRF归一化,除以其最大值;然后尽可能删去前后没有信号只有噪声的部分,只保留峰值;最后在数据最前面插入若干个0,直到IRF的上升沿与荧光数据上升沿的最前端对齐。将处理好的数据放在C列上。
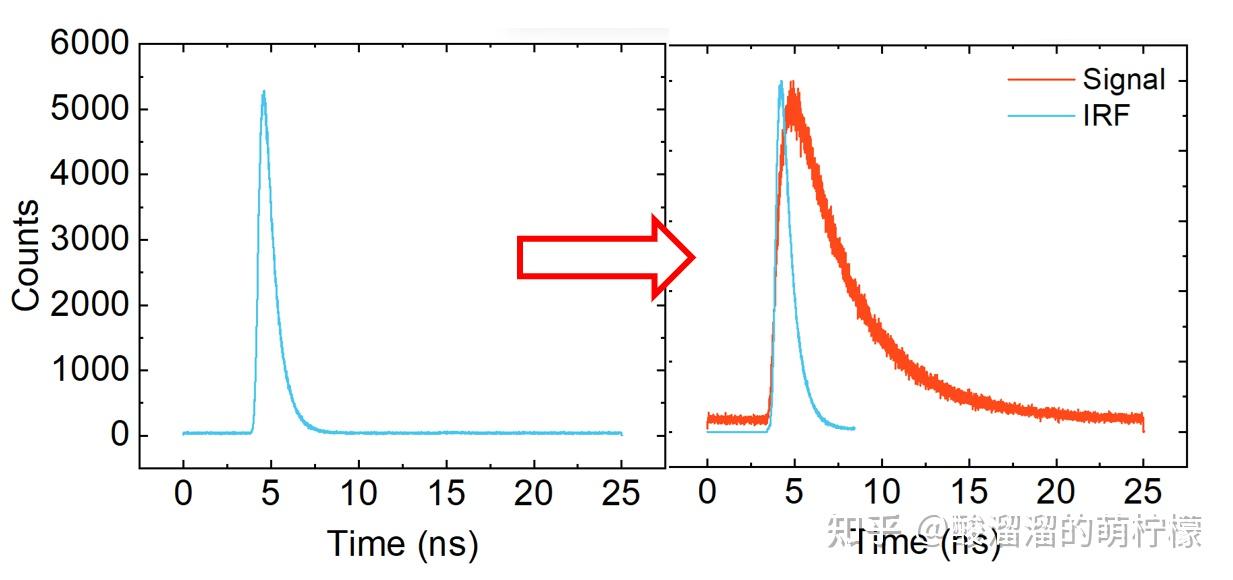
图6 IRF数据的拟合前处理
第三步,开始拟合。此时我们的数据本上A、B、C三列应该分别是x轴数据、待拟合荧光数据和处理后的IRF数据。1. 选中B列,按快捷键Ctrl+Y开始拟合。2. 选择刚才新建的FitConv函数,3. 在设置(Settings)-拟合曲线(Fitted Curves)-X数据类型(X Data Type)中选择 4.“与输入数据相同(Same as Input Data)”。在拟合参数选项卡中,先将弛豫时间 t 手动初始化为一个接近的值,通过点击 5. “计算卡方(Calculate Chi-Square)”观察拟合函数与原始数据的吻合情况,点击“一次迭代(1 Iteration)”观察拟合函数是否收敛。判断拟合参数大致收敛后,点击“拟合至收敛(Fit Until Converged)”。需要注意由于卷积计算时间较长,如果没有手动调整参数的过程,迭代拟合将非常缓慢。
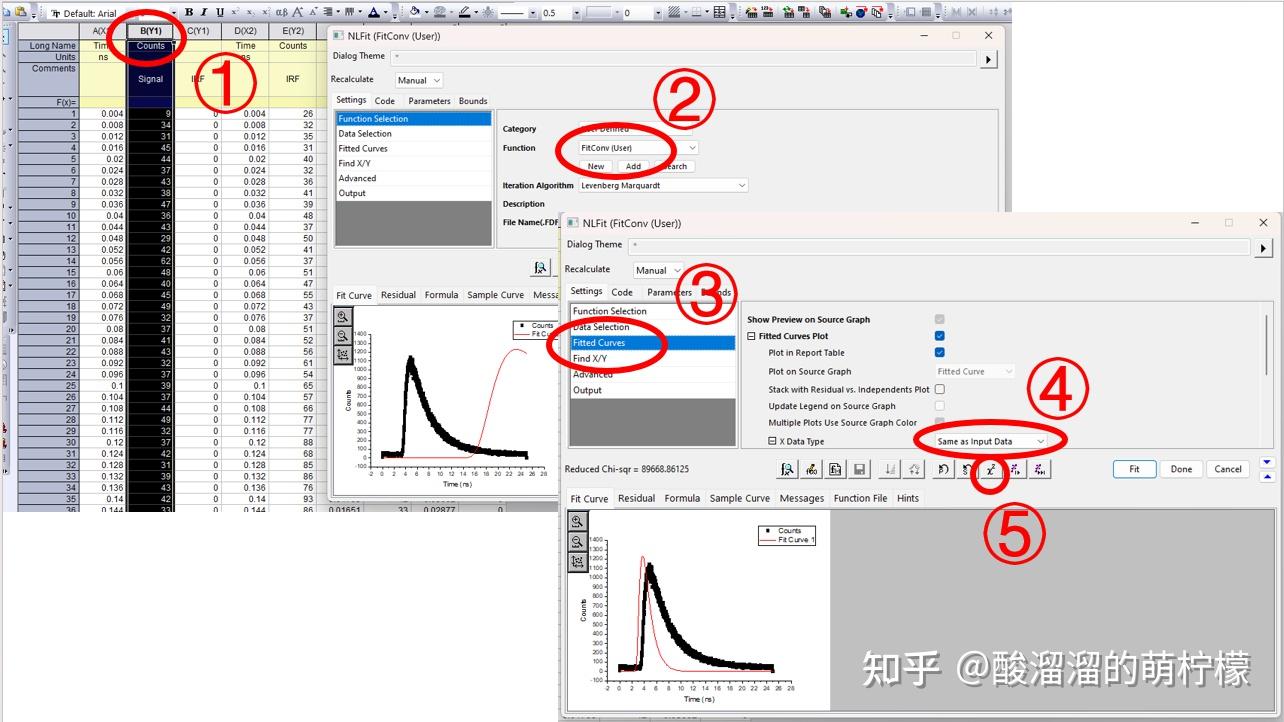
图7 拟合过程
至此,我们完成了包含仪器响应函数的时间分辨荧光谱拟合。可以比较用简单拟合和卷积拟合得到的拟合曲线以及荧光寿命。
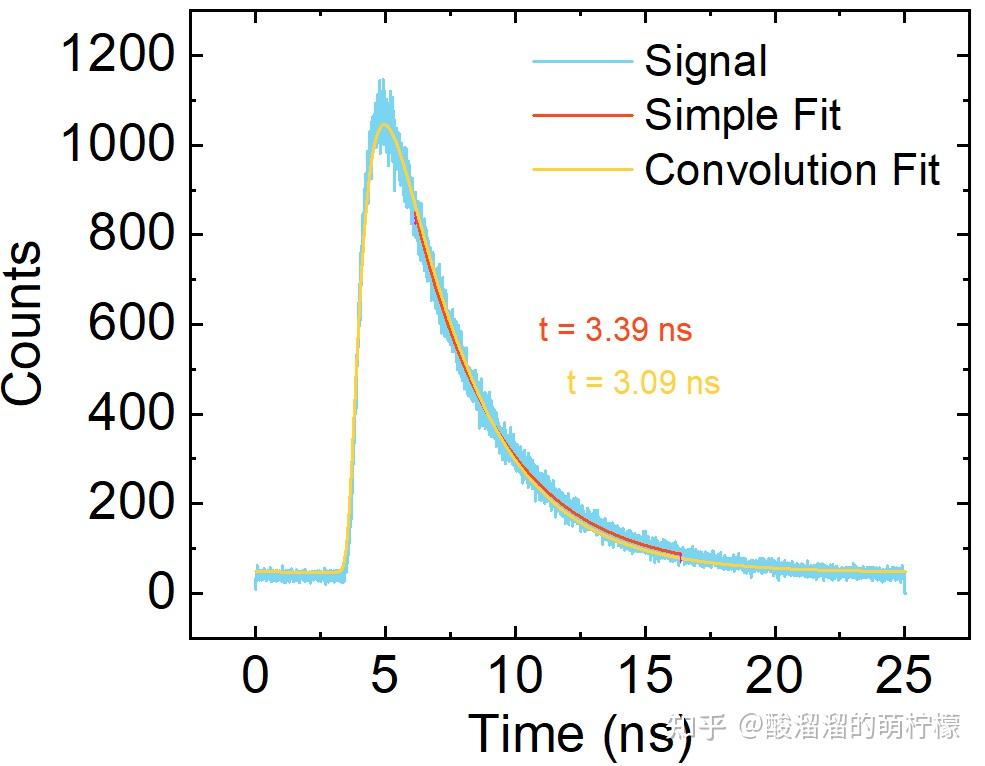
图8 对信号分别使用简单拟合和IRF卷积拟合得到的结果
<hr/>(以下是进阶部分)
- 手动补零对齐IRF的上升沿与荧光数据上升沿总是不精确的,如果想让拟合更加准确,可以添加一个拟合参量t0,并将OriginC程序原本68行的
vSignal = A * exp( -vSample/t );改为
vSignal = A * exp( -(vSample-t0)/t ) * 0.5*(1+erf( 1000*(vSample-t0) ));不过t0只有大于0时才有效果,即拟合函数只能向坐标轴右侧移动。
- 如果荧光寿命是双指数弛豫的,可加入拟合参量A2、t2,将68行改为
vSignal = (A * exp( -vSample/t )+A2 * exp( -vSample/t2 ));
- 按照上述方法得到的拟合结果中,OriginC代码的72行
vSignal = (vSample[1]-vSample[0])*vSignal;起到了修正拟合幅值的作用,如果删去会导致拟合幅值结果不正确。
<hr/>tips:
不删去IRF多余的噪声会导致卷积值过大。
卷积是周期性的,如果弛豫时间过长导致拟合函数坐标轴右侧没有趋于0,那么这个弛豫过程会回到坐标轴左侧,导致拟合不正确。
原文地址:https://zhuanlan.zhihu.com/p/30635455175 |
|

 /3
/3 

 浙公网安备33010802005999号


 2026庆【网站十三周
 2025庆【网站十二周
 2024庆中秋、迎国庆
 2024庆【网站十一周
 2023庆【网站十周年
 2022庆【网站九周年

 发表于 2025-3-31 21:45